There are two problems with the name
“peameal bacon.” The first is that it is
rolled in yellow corn meal, not peameal as it was originally, and the second is
that it is really not bacon! Real ground
meal made of peas is just not very available anymore, and I have no idea why the
name included the word “bacon” because it is made of boneless pork loin. I had heard that it got that name in WWII
because the Canadians sent it to the British who had little meat available
during and immediately after the war. This
article gives more details: https://www.foodnetwork.ca/shows/great-canadian-cookbook/blog/the-history-of-canadian-peameal-bacon/
In any case, the important thing is
that peameal bacon is preserved by brining, not by smoking, as other bacon
is. This means you need to cook the brined
meat, just as you would any unsmoked or precooked pork product. It makes wonderful sandwiches or breakfast
meat with eggs if you just pan fry it in a little butter. It can also be roasted, although I have never
done that. The point is that this meat
does not resemble the smoked and sliced stuff you can buy in this country that
is called “Canadian Bacon.” (Clarification:
You can buy the real peameal bacon in a few specialty stores in cities that
border Ontario, like Detroit and Buffalo.)
It took some internet searching for
recipes and some experimenting to get a recipe that tasted the way I knew it
should. (Hint: If the recipe tells you
to smoke it, forget it!)
The pork loin it is made from is the
chunk of meat that the pork chops come from, except without the bone. Do not cut it up or trim off the layer of fat
on one side—it is so lean that it needs this fat! If you don't find a pork loin in the meat case, ask the butcher. It should look like this and weigh about 3-4
pounds:
Next, you need a large plastic
container with a lid that will hold the meat in one or two chunks and still fit into
your refrigerator. Because I have a very small
refrigerator, I cut the pork loin in two pieces and stuff it in a small, square
container that will fit.
Then you need to get some pink #1 curing
salt. This is an absolute requirement and cannot be substituted! You will probably have to go to a specialty spice
store to get the pink salt. Make sure whoever
you buy the pink salt from knows you are using it to cure meat, so you do NOT accidentally get Himalayan pink salt, which is entirely different. You can get it
from Cabela’s and butcher supply companies. Amazon carries this as well: https://www.amazon.com/Boise-Salt-Co-Prague-Gluten/dp/B07JVHSRK9/ref=sr_1_11_s_it?s=grocery&ie=UTF8&qid=1546908012&sr=1-11&keywords=pink+curing+salt+%231
While you are getting the pink salt,
you might want to get a brine injector, although in a pinch, you can make do
with just sticking holes in the meat with one of those long nails you use to
tie up a turkey. Mine looks like this
one from Amazon, although there are nicer stainless steel models: https://www.amazon.com/Ofargo-Plastic-Marinade-Injector-Download/dp/B078CQ3369/ref=sr_1_cc_4?s=aps&ie=UTF8&qid=1546908399&sr=1-4-catcorr&keywords=brine+injector
When you have the container, meat,
and pink curing salt, gather the following:
- 3 quarts cold water
- 1 cup maple syrup (The real stuff! No substitutes.)
- 3/4 cup kosher salt
- 2 tablespoons Prague powder #1 cure (pink curing salt)
- 2 tablespoons of pickling spices
- 1 tsp garlic powder (optional)
- 1 cup yellow cornmeal
Put the water,
maple syrup, kosher salt, pink curing salt, and pickling spices in a pan and bring
them to a boil. Take off the stove and stir
to make sure all the salt is dissolved. Cool
and pour all but one cup over the meat in the plastic container.
Fill the brine
injector with some of the reserved brine and inject it into the meat about
every inch. It will drip out, so this is
best done in the container or over another container.
When you are done
injecting the meat, dump the remainder of the reserved brine onto the meat in
the container. Put the lid on and put the container in the refrigerator. Let the pork loin sit in the brine for four full
days. Hopefully, the brine will cover the meat entirely,
but it is always a good idea to turn the meat every day. If the meat is floating in the brine and not
covered, you could add something heavy, like a clean plate, to weigh it down.
After four days,
take the meat out of the brine and dry it off with paper towels.
Then roll it in the cup of yellow corn meal and let it sit for a couple
of hours in the refrigerator. I use a plastic bag to coat the meat with the corn meal--much less messy.
At this
point, I usually cut off several slices for immediate cooking and then cut the rest
of the loin into a couple of chunks and freeze it. Slices should be about 1/3” thick, no thinner,
or it will cook too fast and not be juicy.
Fry in butter at
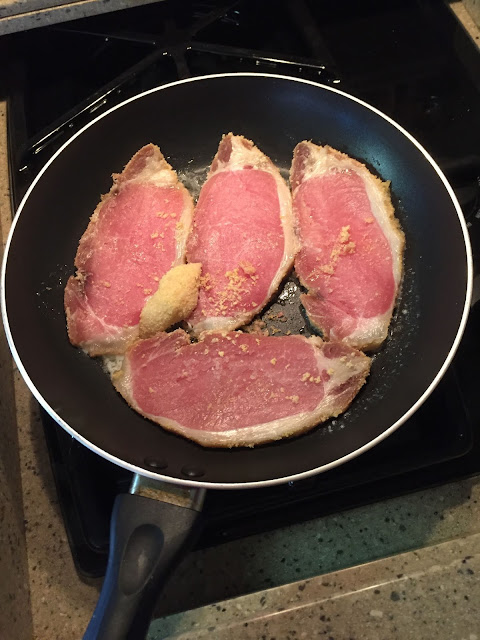
medium heat until the meat is no longer a dark pink. The photo below shows the dark pink color of the meat before it is cooked.
Thee next two photos show how it should look when cooked. I don’t like it overcooked, so I cook it just
until done, as shown in the first photo, but others like it
a little more cooked, as shown in the second photo. (The top piece here was really cut too thin. The bottom piece will be a lot more juicy.)
Some people like to put mustard on it in a sandwich, but I like it plain. It also goes well with eggs at breakfast, but make sure however you eat it, that you eat it hot from the pan.


No comments:
Post a Comment